Simple ingredients present in most kitchens come together to create this wonderful white bread with a juicy interior and a delicate exterior. Whether this is your first or thousandth loaf of homemade bread, our simple recipe will guide you through every step needed to make a great yeast bread.
This easy loaf will demonstrate why making your own bread is so much superior to buying it from the store, as it is full of flavor and contains no preservatives. Expert bakers will discover that this recipe serves as an excellent foundation for exploration. Feel free to experiment and change it to make your own bread recipes if you’re feeling particularly daring. Serve the bread with soup, salad, or any other meal, or slice it and spread it with butter and jam, marmalade, or honey for sandwiches.
The Super-Simple Ingredients You Need to Make a Great Loaf of Bread
Chances are good that you already have what you need in your kitchen to make amazing bread. Here’s a rundown of the key ingredients for this simple loaf.
- Yeast: Yeast is a single-cell organism that needs warmth, food, and moisture to thrive. When it has these things it needs to thrive, it converts its food—sugar and starch—through fermentation, into carbon dioxide and alcohol. The carbon dioxide bubbles help your bread to rise and have a lovely, pillowy texture instead of being dense and tough as a hockey puck. This recipe calls for active dry yeast, which must be rehydrated in liquid before being added to the dough.
- Warm water: Regular old tap water is fine, but slightly warm water—95 F to 110 F—is best for activating the yeast. Water should not be hotter than you can comfortably put your hand in, as hotter temperatures can kill the yeast before it does its work in helping the bread rise. It’s better to err on the side of cooler water, which simply will make your bread take longer to rise.
- Salt: Salt plays many roles in bread baking—it helps control the rise, it strengthens the gluten in the flour, helps give the crust a nice browned color, and, of course, makes it taste better.
- Sugar: A little sugar feeds the yeast and provides a hint of sweetness to your bread.
- Milk: While not essential to all bread, in this recipe milk makes the bread taste richer and helps it develop a golden-brown crust and a lovely, tender texture inside.
- Vegetable shortening or butter: The fat in vegetable shortening improves the texture of this bread and gives it a richer flavor. If you prefer butter, you can substitute it in this and many other bread recipes. The general recommendation for substituting butter for shortening is to add a little more butter for each cup of shortening. However, since this bread only requires 1 tablespoon, your butter substitute should be just fine with that amount. If you want to be safe, cut the butter stick a tiny bit bigger than the tablespoon marker on the package.
- Flour: This recipe uses all-purpose flour because it’s the most common type stocked in the average kitchen. However, if you enjoy baking bread, you’ll want to switch to bread flour. It has more gluten and creates a better tasting bread that rises just a little more. The two types of flour can be substituted in equal measurements in most bread recipes.
What Does Proofing Mean?
You’ll hear proofing in two contexts in bread baking. The first is the process testing yeast to be sure it’s alive before using it in your recipe. The second use of proofing (aka proving) in baking refers to allowing the bread to rise—”proof” is used here because we’re talking about the fermentation action of the yeast causing the dough to rise and create an airy texture. In most basic yeast bread recipes, including this one, the dough is allowed to proof twice: once after kneading and a second time after shaping and before baking.
Why Dough Must Be Kneaded
Knowing how to knead dough is an important step in your bread-making journey. While there is such a thing as no-knead bread, as well as quick breads that don’t require kneading, for many types of bread kneading helps create structure and strength in the dough by helping the two proteins in flour combine to form gluten, which is responsible for creating the elastic texture in the dough and allowing it to trap the gasses that cause the dough to rise.
Why You Need to (Gently) Punch Down Your Dough
After your dough’s first rise, you’ll need to punch down the dough before shaping it into your desired form and letting it rise again. Gently pushing into the dough with your fist breaks up air pockets, creating a final product with a finer texture and better flavor.
Shaping: Turning Your Dough From a Blob into a Loaf
Once you’ve punched down your dough, it’s time to turn that blob of dough into a loaf. This process is called shaping the loaf and it not only creates a better looking loaf, but it also helps the gluten to further develop, improves the structure of the bread, and helps create a nice even exterior.
How—and Why—to Score Your Bread
Before you pop it in the oven, you’ll want to score the loaf of bread by making one or more slashes on the surface of the loaf with a very sharp knife, a razor blade, or a special tool called a lame. Doing so allows the sudden burst of gas that’s produced by the yeast when the dough enters the hot oven (an effect known as “oven spring”) a controlled way to escape. Otherwise, the escaping gas can produce large, ragged holes in your bread or lumps that protrude from the loaf on the top, bottom, or side. You can make one long slash along the length of the bread, a cross-hatch pattern, or elaborate designs—as long as you give that gas somewhere to go, you’ll be good.
“The recipe is great for beginners, but also enjoyable for experienced bakers. It’s a standard white bread with no fuss, special ingredients, or advanced techniques. Since it’s so easy, it’s a great recipe to familiarize yourself with kneading, proofing, shaping, and scoring, even experimenting with different approaches to each.” —Diana Rattray
:max_bytes(150000):strip_icc():format(webp)/super-easy-bread-for-beginners-428108-c-graham-2019-1011-2ce9db6883474dab8010a70656c3856b.jpg)
A Note From Our Recipe Tester
Ingredients
- 3/4 cup warm water (95 F to 110 F)
- 2 1/4 teaspoons (1/4 ounce/ 7 grams) active dry yeast
- 1 teaspoon salt
- 1 1/2 tablespoons sugar
- 1/2 cup milk
- 1 tablespoon vegetable shortening
- 3 cups all-purpose flour (approximately)
Steps to Make It
Mix the Bread Dough
- Gather the ingredients.
:max_bytes(150000):strip_icc():format(webp)/super-easy-bread-for-beginners-428108-bread-dough-step-01-1481558cfd6746b482acaa83322fa350.jpg) The Spruce Eats / Cara Cormack
The Spruce Eats / Cara Cormack - Pour the warm water into a large bowl.
:max_bytes(150000):strip_icc():format(webp)/super-easy-bread-for-beginners-428108-bread-dough-step-02-5f0c26745922492090e39da3e45ccc2c.jpg) The Spruce Eats / Cara Cormack
The Spruce Eats / Cara Cormack - Slowly stir in the yeast until it is dissolved.
:max_bytes(150000):strip_icc():format(webp)/super-easy-bread-for-beginners-428108-bread-dough-step-03-9e76307fc1f94dafabd3bdcdadebac4f.jpg) The Spruce Eats / Cara Cormack
The Spruce Eats / Cara Cormack - Add the salt, sugar, and milk to the bowl. Stir until everything is thoroughly combined.
:max_bytes(150000):strip_icc():format(webp)/super-easy-bread-for-beginners-428108-bread-dough-step-04-d0e13a6d76d34762ad78532dd9030113.jpg) The Spruce Eats / Cara Cormack
The Spruce Eats / Cara Cormack - Mix in the shortening and the first 2 cups of flour. The shortening will continue to integrate into the dough while kneading, so don’t worry if there are still small lumps at this stage.
:max_bytes(150000):strip_icc():format(webp)/super-easy-bread-for-beginners-428108-bread-dough-step-05-87df2371cf8d4893aeb23832e7895797.jpg) The Spruce Eats / Cara Cormack
The Spruce Eats / Cara Cormack - If needed, begin adding more flour, 1 tablespoon at a time, until the dough chases the spoon around the bowl.
:max_bytes(150000):strip_icc():format(webp)/super-easy-bread-for-beginners-428108-bread-dough-step-06-cfc58e956d904a9797e216e2395a99bd.jpg) The Spruce Eats / Cara Cormack
The Spruce Eats / Cara Cormack
Prepare and Bake the Bread Dough
- Turn the dough out onto a floured board and knead for about 10 minutes. Add small spoonfuls of flour as necessary, until the dough is soft and smooth (not sticky to the touch). You may not need all of the flour, or you may need a little more. Keep the surface floured to prevent the dough from sticking to the board and your hands.
:max_bytes(150000):strip_icc():format(webp)/super-easy-bread-for-beginners-428108-prepare-step-01-6ba68c70b8654703ba5acef5fec32f82.jpg) The Spruce Eats / Cara Cormack
The Spruce Eats / Cara Cormack - Put the dough in a greased or buttered bowl and turn the dough over so the other side is also greased.
:max_bytes(150000):strip_icc():format(webp)/super-easy-bread-for-beginners-428108-prepare-step-02-587ea4bd678548c7a08b773672b514e3.jpg) The Spruce Eats / Cara Cormack
The Spruce Eats / Cara Cormack - Cover and let the dough rise in a warm, draft-free spot, such as an oven with the light on, for about 1 hour, or until doubled.
:max_bytes(150000):strip_icc():format(webp)/super-easy-bread-for-beginners-428108-prepare-step-03-6cf0ef461d9d4fa0bbf5177942847777.jpg) The Spruce Eats / Cara Cormack
The Spruce Eats / Cara Cormack - Punch down the dough.
:max_bytes(150000):strip_icc():format(webp)/super-easy-bread-for-beginners-428108-prepare-step-04-13aeaefb22ab4dfb9bcab484fa7f133b.jpg) The Spruce Eats / Cara Cormack
The Spruce Eats / Cara Cormack - Turn the dough out onto a floured board and knead for 5 minutes.
:max_bytes(150000):strip_icc():format(webp)/super-easy-bread-for-beginners-428108-prepare-step-05-b759c6ac55a1403fa1c1793e4eed2048.jpg) The Spruce Eats / Cara Cormack
The Spruce Eats / Cara Cormack - Form the dough into a loaf (here are some helpful tips) and set it gently into a greased bread pan.
:max_bytes(150000):strip_icc():format(webp)/super-easy-bread-for-beginners-428108-prepare-step-06-a16bbd6a1bb047159c24ece3d0f36c5c.jpg) The Spruce Eats / Cara Cormack
The Spruce Eats / Cara Cormack - Cover and let rise for about 30 minutes, or until doubled. If your kitchen is chilly or drafty, place the pan in a cool oven with the light on for this step, or you may not get a proper rise. Preheat the oven to 375 F.
:max_bytes(150000):strip_icc():format(webp)/super-easy-bread-for-beginners-428108-prepare-step-07-9ef531362bcb4dec945baea7c389d83b.jpg) The Spruce Eats / Cara Cormack
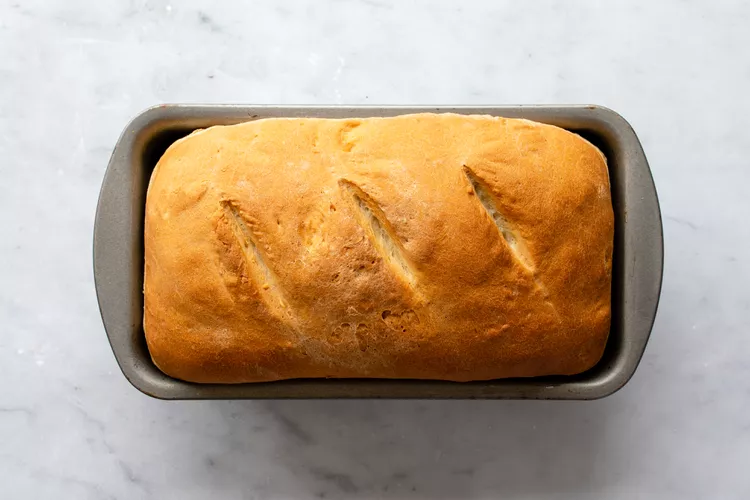
The Spruce Eats / Cara Cormack - Score the risen dough by cutting three slashes across the top with a sharp knife. While not essential, this step controls the direction in which the bread expands as it bakes. (If you forget to do it, the bread will taste the same.)
:max_bytes(150000):strip_icc():format(webp)/super-easy-bread-for-beginners-428108-014-02-7b18877e5ca14d9089f149cdb6a1c6fa.jpg) The Spruce Eats /Cara Cormack
The Spruce Eats /Cara Cormack - Place the bread in the oven and bake for about 35 to 45 minutes or until golden brown.
:max_bytes(150000):strip_icc():format(webp)/super-easy-bread-for-beginners-428108-015-6eab618b30f148b8af31b53bcd2cff88.jpg) The Spruce Eats / Cara Cormack
The Spruce Eats / Cara Cormack - Turn out the loaf of bread and let it cool completely on a rack or clean dish towel before slicing.
:max_bytes(150000):strip_icc():format(webp)/super-easy-bread-for-beginners-428108-016-c7c70b5b86b840c7b22645454505b6bc.jpg) The Spruce Eats / Cara Cormack
The Spruce Eats / Cara Cormack - Slice and pair with your favorite jam, butter, or sandwich toppings.
:max_bytes(150000):strip_icc():format(webp)/super-easy-bread-for-beginners-428108-hero-02-ba2300482bb44ad89f4aeda73112d02f.jpg)